HuangAnqi
理论相关
cp2k
cp2k参数
CP2K输入文件模板
Matlab批量计算CP2K的差分电荷的代码
全波电磁仿真
VESTA:制作差分电荷&导出图片
Oringin制作气泡能带图+DOS图
VASP
vasp+机器学习计算AlN的势函数
vsap机器学习
vasp算微波介电常数
VASP计算参数
vaspkit功能
VASP算bader电荷
计算带格林内森参数投影的高温声子谱
脚本合集
PWmat
用pwmat计算缺陷形成能
Hefei-NAMD
Quantum ESPRESSO
qe算声子谱
CALYPSO结构搜索
Oringin
Yambo
QE+yambo算光吸收虚部
Yambo 光吸收计算后处理
Yambo报错和解决办法
知识点
代码
佛祖保佑
心跳(html)
洛伦兹吸引子
用pandas读取excel 画dos图
用Matplotlib画折线图
蒙特卡洛方法求Π
TensorFlow 代码
罗盘时钟
MATLAB代码
批量重命名图片代码
用Pr将序列帧图片转成视频
蒙特卡洛方法模拟二维平面上的原子沉积和扩散
PyTorch
OVITO
Latex安装与使用
wannier+VASP拟合能带
VASP算有效质量
liuyaoze.com-文档系统
-
+
首页
TensorFlow 代码
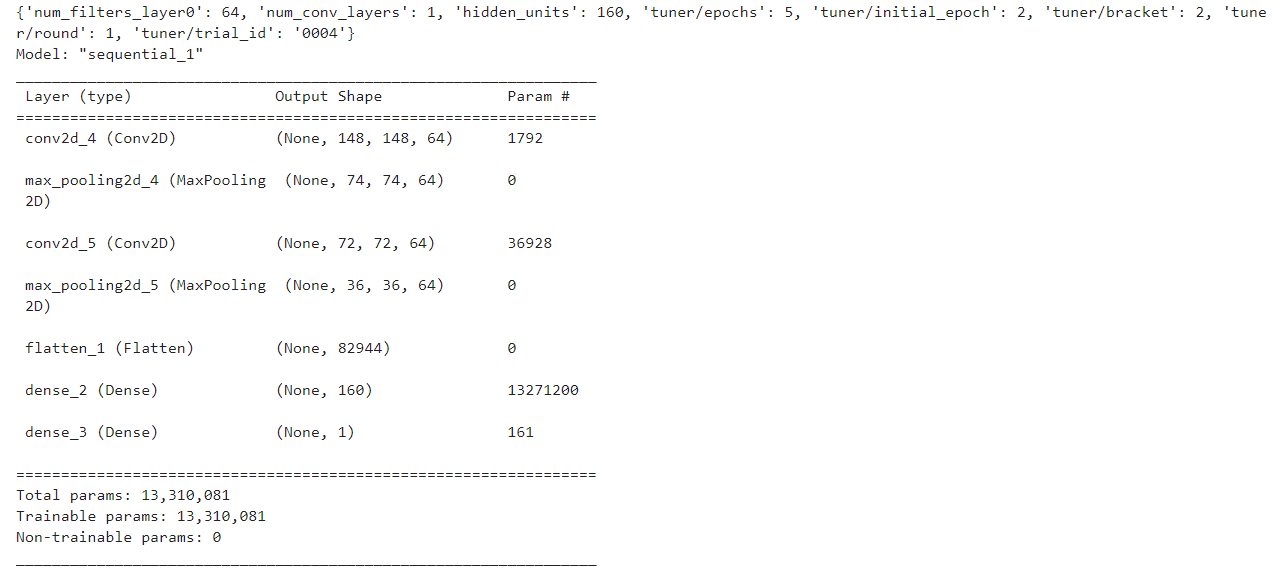
从Anaconda中转出 [网易TensorFlow 入门实操课程链接](https://www.icourse163.org/learn/youdao-1460578162?tid=1461280442#/learn/content?type=detail&id=1239078006&sm=1 "网易课程链接") [课程代码原文下载](https://note.youdao.com/coshare/index.html?token=6AD21133F93449538732CAFE13303CF2&gid=117583840#/906295617 "课程代码原文下载") ## 1.线性拟合预测 ```python #!/usr/bin/env python # coding: utf-8 # In[2]: get_ipython().run_line_magic('config', 'IPCompleter.greedy=True') # In[12]: from tensorflow import keras #keras是tensorflow中的一个API import numpy as np model=keras.Sequential([keras.layers.Dense(units=1,input_shape=[1])]) #layers代表一层神经元,其中units也只有1,input_shape是输入值 model.compile(optimizer='sgd',loss='mean_squared_error') #根据什么来优化,根据什么来检测损失函数,loss值越来越小证明训练靠谱 xs=np.array([-1.0,0.0,1.0,2.0,3.0,4.0],dtype=float) ys=np.array([-3.0,-1.0,1.0,3.0,5.0,7.0],dtype=float) model.fit(xs,ys,epochs=500) #训练次数500 # In[13]: model.predict([10.0]) #输出x=10时的预测值 ``` ## 2.加载数据库 ```python #!/usr/bin/env python # coding: utf-8 # In[2]: #加载Fashion MNIST数据集 from tensorflow import keras fashion_mnist = keras.datasets.fashion_mnist (train_images,train_labels),(test_images,test_labels) = fashion_mnist.load_data() # In[6]: print(train_images.shape) #60000张图片,28*28像素,其中都是灰度值 print(test_images.shape) #测试集10000张,要是没见过的,用于测试准确度 # In[5]: import matplotlib.pyplot as plt plt.imshow(train_images[0]) #显示第0张图片 ``` ## 2.构建网络神经元,通过数据库来训练 ```python #!/usr/bin/env python # coding: utf-8 # In[1]: #加载Fashion MNIST数据集 import tensorflow as tf from tensorflow import keras fashion_mnist = keras.datasets.fashion_mnist (train_images,train_labels),(test_images,test_labels) = fashion_mnist.load_data() # In[2]: #构造神经元模型 model = keras.Sequential([ keras.layers.Flatten(input_shape=(28,28)), #输入层 keras.layers.Dense(128,activation=tf.nn.relu), #中间层,128个神经元,relu/softmax-激活函数 keras.layers.Dense(10,activation=tf.nn.softmax) #输出层,10个类别 ]) # In[3]: model.summary() # In[4]: train_images=train_images/255 #normalization,把像素数值变成0~1之间的数 model.compile(optimizer="adam",loss="sparse_categorical_crossentropy",metrics=['accuracy']) #优化和损失函数 # In[5]: model.fit(train_images,train_labels,epochs=5) #训练,所有数据跑五次 # In[6]: test_images=test_images/255 model.evaluate(test_images,test_labels) #评估成效 ,loss和accuracy跟训练的时候差不多 # In[7]: #类别 0_Tshirt/top,1_trouser/pants,2_pullover shirt,3_Dress,4_coat,5__sandal,6_shirt,7_sneaker,8_bag,9_anklle boot # In[15]: import numpy as np np.argmax(model.predict((test_images[0]/255).reshape(1,28,28,1))) #预测第一张图片的类别,输出可能属于几个类别的概率,用argmax直接输出概率最大的标签编号 # In[16]: import matplotlib.pyplot as plt print(test_labels[0]) plt.imshow(test_images[0]) #核对答案 ``` ## 3.自动终止训练(回调函数) ```python #!/usr/bin/env python # coding: utf-8 # In[1]: import tensorflow as tf # In[8]: class myCallback(tf.keras.callbacks.Callback): def on_epoch_end(self,epoch,logs={}): if(logs.get('loss')<0.4): print('\nloss is low so cancelling training!') self.model.stop_training = True callbacks = myCallback() mnist = tf.keras.datasets.fashion_mnist (training_images,training_labels),(test_images,test_labels)=mnist.load_data() training_images=training_images/255.0 test_images=test_images/255.0 model=tf.keras.models.Sequential([ tf.keras.layers.Flatten(input_shape=(28, 28)), tf.keras.layers.Dense(512,activation=tf.nn.relu), tf.keras.layers.Dense(10,activation=tf.nn.softmax) ]) model.compile(optimizer='adam',loss='sparse_categorical_crossentropy',metrics=['accuracy']) model.fit(training_images,training_labels,epochs=5,callbacks=[callbacks]) ``` ## 4.卷积神经网络 ```python #!/usr/bin/env python # coding: utf-8 # In[3]: #加载Fashion MNIST数据集 import tensorflow as tf from tensorflow import keras fashion_mnist = keras.datasets.fashion_mnist (train_images,train_labels),(test_images,test_labels) = fashion_mnist.load_data() # In[5]: #构造神经元模型+卷积网络 model = keras.Sequential([ keras.layers.Conv2D(64,(3,3),activation='relu',input_shape=(28,28,1)), #64个3x3大小的过滤器 keras.layers.MaxPooling2D(2,2), #卷积后,用maxpooling增强它的特征,减少数据,2x2四个像素 keras.layers.Conv2D(64,(3,3),activation='relu'), #64个3x3大小的过滤器 keras.layers.MaxPooling2D(2,2), keras.layers.Flatten(input_shape=(28,28)), #输入层 keras.layers.Dense(128,activation=tf.nn.relu), #中间层,128个神经元,relu/softmax-激活函数 keras.layers.Dense(10,activation=tf.nn.softmax) #输出层,10个类别 ]) # In[8]: model.compile(optimizer='adam',loss='sparse_categorical_crossentropy',metrics=['accuracy']) model.fit(train_images,train_labels,epochs=5) #训练结果更加准确,时间更长 # In[10]: model.summary() #查看神经元网络结构 # In[14]: #把每层分开 import matplotlib.pyplot as plt layer_outputs = [layer.output for layer in model.layers] activation_model = tf.keras.models.Model(inputs= model.input,outputs = layer_outputs) pred = activation_model.predict(test_images[0].reshape(1,28,28,1)) pred #可以看到七层输出 # In[21]: plt.imshow(pred[0][0,:,:,4]) #以图片形式查看第一层,所有行所有列第二个过滤器的卷积结果 ``` ## 项目实战(人和马) ```python #!/usr/bin/env python # coding: utf-8 # In[9]: #下载文件到当前目录,并且进行解压,此处省略代码 get_ipython().system('wget --no-check-certificate https://storage.googleapis.com/laurencemoroney-blog.appspot.com/validation-horse-or-human.zip -o /tmp/validation-horse-or-human.zip') # In[10]: import tensorflow as tf import scipy from tensorflow.keras.preprocessing.image import ImageDataGenerator from tensorflow.keras.optimizers import RMSprop #创建两个数据生成器,指定scaling范围0~1 train_datagen = ImageDataGenerator(rescale=1/255) validation_datagen = ImageDataGenerator(rescale=1/255) #指向训练数据文件夹 train_generator = train_datagen.flow_from_directory( 'C:/Users/82399/validation-horse-or-human/',#训练数据所在文件夹 target_size=(150,150), #指定输出尺寸,设置的小防止内存不够 batch_size=32, #指定每一批取多少 class_mode='binary') #指定为二分类 #指向测试数据文件夹 validation_generator = validation_datagen.flow_from_directory( 'C:/Users/82399/horse-or-human/',#训练数据所在文件夹 target_size=(150,150), #指定输出尺寸 batch_size=32, #指定每一批取多少 class_mode='binary') #指定为二分类 # In[18]: pip install keras-tuner --upgrade # In[11]: #构建神经网络 #引入kerastuner中的hperband方法,对于一些网络里的参数可以实现循环计算以探究最合适的数字 from keras_tuner.tuners import Hyperband from keras_tuner.engine.hyperparameters import HyperParameters hp = HyperParameters() #定义一种参数类型 def build_model(hp): model = tf.keras.models.Sequential() model.add(tf.keras.layers.Conv2D(hp.Choice('num_filters_layer0',values=[16,64],default=16),(3,3),activation='relu',input_shape=(150,150,3))) model.add(tf.keras.layers.MaxPooling2D(2,2)) for i in range(hp.Int(f'num_conv_layers',1,3)): #1-3之间取整 model.add(tf.keras.layers.Conv2D(hp.Choice('num_filters_layer0',values=[16,64],default=16),(3,3),activation='relu')) model.add(tf.keras.layers.MaxPooling2D(2,2)) model.add(tf.keras.layers.Flatten())#将结果压平,反馈给深度神经网络DNN model.add(tf.keras.layers.Dense(hp.Int('hidden_units',128,512,step=32),activation='relu'))#512个神经元 model.add(tf.keras.layers.Dense(1,activation='sigmoid'))#只有一个输出神经元,因为结果是二分类的,0-马,1-人 model.compile(loss='binary_crossentropy',optimizer=RMSprop(learning_rate=0.001),metrics=['acc']) return model tuner =Hyperband( build_model, objective='val_acc', max_epochs=15, directory='horse_human_params', hyperparameters=hp, project_name='my_horse_human-project' ) # In[12]: #开始计算,根据参数的多少,计算时间较长 tuner.search(train_generator,epochs=10,validation_data=validation_generator) #结果Trial 30 Complete [00h 04m 34s] #val_acc: 0.7994157671928406 #Best val_acc So Far: 0.8938656449317932 #Total elapsed time: 00h 41m 48s #INFO:tensorflow:Oracle triggered exit # In[13]: #查看能使性能最好的参数,并以该组参数建立新的神经网路 best_hps=tuner.get_best_hyperparameters(1)[0] print(best_hps.values) model=tuner.hypermodel.build(best_hps) model.summary() ```  ## 项目实战(猫和狗) ```python #!/usr/bin/env python # coding: utf-8 # In[2]: import tensorflow as tf import os import random from shutil import copyfile # In[12]: #访问 https://www.microsoft.com/en-us/download/confirmation.aspx?id=54765 获得数据包,解压缩到当前文件夹 print(len(os.listdir('C:/Users/82399/PetImages/Cat'))) print(len(os.listdir('C:/Users/82399/PetImages/Dog'))) # Expected Output: # 12501 # 12501 # In[21]: #创建用于训练和测试的文件夹 try: os.mkdir('C:/Users/82399/cat-v-dog/') os.mkdir('C:/Users/82399/cat-v-dog/training') os.mkdir('C:/Users/82399/cat-v-dog/training/cat') os.mkdir('C:/Users/82399/cat-v-dog/training/dog') os.mkdir('C:/Users/82399/cat-v-dog/testing') os.mkdir('C:/Users/82399/cat-v-dog/testing/cat') os.mkdir('C:/Users/82399/cat-v-dog/testing/dog') except OSError: pass # In[ ]: #定义一个函数,来把数据图片按比例且随机地分给训练集和测试集 #路径加文件名等于下一级路径,所以参数中的问价夹路径应该要加/ def spilt_data(source,training,testing,spilt_size=0.9): files=[] for filename in os.listdir(source): file = source + filename if os.path.getsize(file) >0: files.append(filename) else: print(filename + "is zero length,so ignoring.") training_length = int(len(files)*spilt_size) #训练集长度 testing_length = int(len(files)-training_length) #测试集长度 shuffled_set = random.sample(files,len(files)) #打乱顺序 training_set = shuffled_set[0:training_length] #规定训练集 testing_set = shuffled_set[-testing_length:] #规定测试集 #训练集和测试集数据复制到新建文件夹 for filename in training_set: this_file = source + filename destination = training + filename copyfile(this_file,destination) for filename in testing_set: this_file = source + filename destination = testing + filename copyfile(this_file,destination) cat_source_dir = 'C:/Users/82399/PetImages/Cat/' dog_source_dir = 'C:/Users/82399/PetImages/Dog/' cat_training_dir = 'C:/Users/82399/cat-v-dog/training/cat/' dog_training_dir = 'C:/Users/82399/cat-v-dog/training/dog/' cat_testing_dir = 'C:/Users/82399/cat-v-dog/testing/cat/' dog_testing_dir = 'C:/Users/82399/cat-v-dog/testing/dog/' spilt_data(cat_source_dir,cat_training_dir,cat_testing_dir) spilt_data(dog_source_dir,dog_training_dir,dog_testing_dir) # Expected output # 666.jpg is zero length, so ignoring # 11702.jpg is zero length, so ignoring # In[4]: #查看数据数量 print(len(os.listdir('C:/Users/82399/cat-v-dog/training/cat/'))) print(len(os.listdir('C:/Users/82399/cat-v-dog/training/dog/'))) print(len(os.listdir('C:/Users/82399/cat-v-dog/testing/cat/'))) print(len(os.listdir('C:/Users/82399/cat-v-dog/testing/dog/'))) # Expected output: # 11250 # 11250 # 1250 # 1250 # In[3]: #数据预处理,进行归一化,减少运算量 #RGB值都归一化,二分类,每一批取100个,输出150*150像素的照片 from tensorflow.keras.preprocessing.image import ImageDataGenerator training_dir = 'C:/Users/82399/cat-v-dog/training' train_datagen = ImageDataGenerator(rescale=1.0/255.0) train_generator = train_datagen.flow_from_directory(training_dir,batch_size=100,class_mode='binary',target_size=(150,150)) testing_dir = 'C:/Users/82399/cat-v-dog/testing' test_datagen = ImageDataGenerator(rescale=1.0/255.0) test_generator = test_datagen.flow_from_directory(testing_dir,batch_size=100,class_mode='binary',target_size=(150,150)) # Expected Output: # Found 22498 images belonging to 2 classes. # Found 2500 images belonging to 2 classes. # In[4]: #构建CNN模型,Sequential表示每层按顺序链接。共有三对卷积+最大池化,最后一次池化层被展平(Flatten), from tensorflow.keras.optimizers import RMSprop model = tf.keras.models.Sequential([ tf.keras.layers.Conv2D(16,(3,3),activation='relu',input_shape= (150,150,3)), #3表示彩色图片3个通道 tf.keras.layers.MaxPooling2D(2,2), tf.keras.layers.Conv2D(32,(3,3),activation='relu'), tf.keras.layers.MaxPooling2D(2,2), tf.keras.layers.Conv2D(64,(3,3),activation='relu'), tf.keras.layers.MaxPooling2D(2,2), tf.keras.layers.Flatten(), tf.keras.layers.Dense(512,activation='relu'), tf.keras.layers.Dense(1,activation='sigmoid') #二分类问题,输出只需1个神经元 ]) #优化方法,步长,损失函数为二元交叉熵 model.compile(optimizer=RMSprop(learning_rate=0.001),loss='binary_crossentropy',metrics=['acc']) # In[5]: #进行拟合,5轮(效果好要改多一点),每轮255批(每批100个),verbose显示日志 #history就是一个拟合过程的日志 history = model.fit_generator(train_generator,epochs=5,verbose=1,validation_data=test_generator) # In[7]: #%matplotlib inline 可以在Ipython编译器里直接使用,功能是可以内嵌绘图,并且可以省略掉plt.show()这一步 get_ipython().run_line_magic('matplotlib', 'inline') import matplotlib.image as mping import matplotlib.pyplot as plt acc = history.history['acc'] val_acc=history.history['val_acc'] loss = history.history['loss'] val_loss = history.history['val_loss'] epochs = range(len(acc)) plt.plot(epochs,acc,'r','Training Accuracy') #x,y,颜色,名称 plt.plot(epochs,val_acc,'b','Validation Accuracy') plt.title('Training and validation accuracy') plt.figure() plt.plot(epochs,loss,'r','Training Loss') plt.plot(epochs,val_loss,'b','validation_Loss') plt.title('Training and validation Loss') plt.figure() ```
huanganqi
2022年9月23日 17:23
131
0 条评论
转发文档
收藏文档
上一篇
下一篇
手机扫码
复制链接
手机扫一扫转发分享
复制链接
【温馨提示:本站文档可配置可见范围,如登录后可见、对特定群组可见等,看不到或进不去就是没权限】
暂时不开放注册
Markdown文件
Word文件
PDF文档
PDF文档(打印)
分享
链接
类型
密码
更新密码
有效期